Halloween creeps up faster than you’d expect, and suddenly you’re scrolling through nail inspiration at midnight wondering what design will actually work with your schedule and skill level. The beauty of Halloween nail art lies in its flexibility; you can go subtle with a single accent nail or fully commit to a spooky masterpiece that commands attention. These ideas balance creativity with accessibility, meaning you can achieve them whether you’re visiting a salon or painting at home.
What makes these designs special is their versatility across nail lengths, shapes, and comfort levels. Each idea works beautifully on short nails or long ones, and most require only basic tools and patience rather than advanced techniques. Keep scrolling to discover 15 Halloween nail ideas that feel fresh, achievable, and genuinely exciting to wear.
Easy Halloween Nail Ideas
1. Black Cat Silhouette Nails
Black cat nails transform your fingertips into miniature works of spooky art that feels instantly recognizable and charming. Paint a white or cream base coat, then add a simple black cat silhouette on each nail using a thin nail art brush or even a toothpick dipped in black polish.
The design works beautifully because it balances bold graphic elements with negative space, creating visual interest without overwhelming your hands. You can position the cat sitting, arching its back, or walking across the nail to add personality and variety to each finger.
- Nail shape: Round or almond
- Base color: White, cream, or soft beige
- Accent details: Black cat silhouettes with tiny white dot eyes
- Finish: Matte or glossy topcoat
- Optional add ons: Tiny moon shapes or stars in the background
This design feels modern and playful while remaining office appropriate if you dial back the spook factor slightly. The contrast between the light base and dark cats ensures visibility and visual impact, making these nails work from close range and across a room. Expect this manicure to last about two weeks with careful handling and regular topcoat application.
2. Vampire Fang French Tips
Vampire fang nails put a Halloween twist on the classic French manicure by replacing traditional white tips with sharp, elongated red or white tips that mimic fangs. Begin with a natural or pale pink base, then create pointed tips using bright red or white polish, extending slightly longer than traditional French nails for dramatic effect.
The genius of this design lies in its simplicity paired with undeniable impact and recognizability. You achieve a vampire aesthetic without needing detailed nail art skills, and the design reads as intentional and polished rather than accidental.
- Nail shape: Coffin or stiletto (longer shapes emphasize fangs)
- Base color: Natural, pale pink, or nude
- Accent details: Red or white pointed tips extending into fang shapes
- Finish: Glossy topcoat for shine and drama
- Optional add ons: Tiny blood drip details or a line of rhinestones along the tip
These nails suit Halloween parties, costume events, and anyone wanting to make a statement without committing to full nail art. The design photographs beautifully and holds its shape well throughout the season. Plan to refresh the topcoat every five to seven days to maintain the glossy finish and protect the design.
3. Mummy Wrapped Fingers
Mummy nails create a textured, wrapped appearance by layering white or off white strips across a nude or tan base to mimic bandages wound around each finger. Use a thin brush or striping tape to paint diagonal or horizontal lines of white polish, leaving small gaps between each strip for authenticity and visual interest.
This design appeals to people who love details and dimension because the layered effect creates genuine texture and depth on the nail. The wrapped appearance feels three dimensional, especially when you vary the angle of the strips across different nails.
- Nail shape: Oval or square
- Base color: Nude, tan, or warm beige
- Accent details: White or cream bandage strips with tiny black dots for “eyes” peeking through
- Finish: Matte for authenticity or glossy for polish
- Optional add ons: Gold accents or a slightly weathered finish using brown or gray polish
Mummy nails work especially well for anyone seeking a design that feels costume adjacent without requiring a full outfit. The wrapped appearance suggests effort and creativity while remaining achievable in a home or salon setting. This design typically lasts two to three weeks, though you may need to touch up white details if they chip or show wear.
4. Spiderweb Accent Nails
Spiderweb nails feature one or two accent nails decorated with delicate white or silver webbing across a black or dark purple base, while remaining nails stay a solid complementary color. Paint thin curved lines radiating from one corner, then connect them with smaller lines to create an intricate web pattern that feels organic and slightly asymmetrical.
The design balances spookiness with elegance because webs suggest Halloween without feeling cartoonish or juvenile. You can customize the web density and placement, making it feel tailored to your personal style and comfort level with nail art.
- Nail shape: Almond or oval
- Base color: Black, dark purple, or deep navy for the web accent nails; complement with a solid nude or burgundy on other nails
- Accent details: Fine white or silver webbing lines creating an intricate pattern
- Finish: Glossy topcoat
- Optional add ons: Tiny black spiders or rhinestones positioned on the web
This design appeals to people who want Halloween nails without committing fully to the theme on every finger. The asymmetrical nature of webs means small imperfections feel intentional, making this design forgiving for home application. Expect the web details to remain visible and attractive for two to three weeks with regular topcoat maintenance.
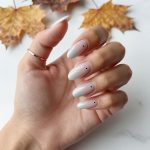
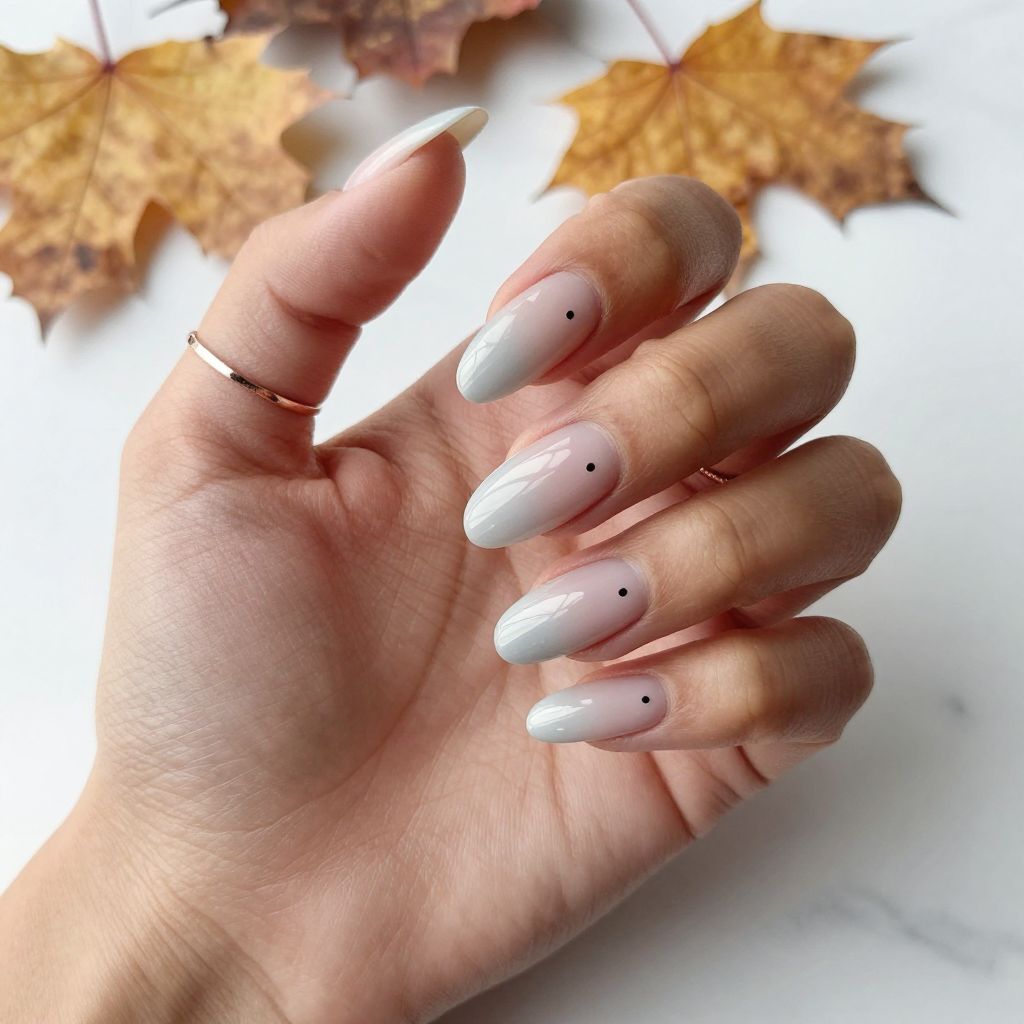
5. Ghostly Ombre Fade Nails
Ghostly ombre nails create an ethereal effect by blending white or pale gray at the base into a transparent or nude tone toward the tips, creating a fading, almost translucent ghostly appearance. Use a makeup sponge to gently dab and blend the two colors together, building the gradient slowly for a smooth transition that feels soft and haunting.
This design appeals to minimalists and people preferring understated spooky aesthetics because it suggests Halloween without explicit imagery. The ombre technique creates dimension and visual interest while feeling sophisticated and wearable across contexts.
- Nail shape: Coffin, almond, or oval
- Base color: White or pale gray fading into nude or natural nail color
- Accent details: Tiny black dots for eyes on one or two nails (optional)
- Finish: Glossy topcoat for a polished, ethereal appearance
- Optional add ons: Fine white shimmer dust or pearl finish for ethereal shimmer
The ombre technique rewards patience because rushed blending creates harsh lines instead of smooth transitions. This design translates beautifully to both short and long nails and suits professional or casual settings equally well. The subtle nature means these nails maintain their appeal throughout the entire Halloween season and beyond.
6. Blood Drip Accent Design
Blood drip nails feature a glossy nude or white base with dramatic red drips running down from the tips, creating a gruesome yet artistic effect that suggests something sinister happening on your fingertips. Paint the base color first, then use a thin brush to create irregular red lines descending from the tip toward the base, varying the length and thickness for authenticity.
The design balances gore with polish because the clean base color and intentional drip placement prevent it from looking sloppy. The contrast between the neutral base and bright red creates visual drama that photographs exceptionally well.
- Nail shape: Almond, oval, or coffin
- Base color: Nude, white, or pale pink
- Accent details: Bright red drips flowing downward from the nail tips
- Finish: High gloss topcoat for dramatic shine
- Optional add ons: Black details or fingerprints scattered across the design
This design reads as intentional and artistic rather than accidental or careless, making it suitable for Halloween events and parties. The drips require a steady hand but reward careful application with striking results. Maintain the glossy finish throughout wear to preserve the dramatic impact and prevent the design from appearing dull.
7. Frankenstein’s Monster Nails
Frankenstein nails celebrate the classic monster through a minty green or olive base with bold black lines creating the distinctive flat top hairstyle and facial features characteristic of the creature. Apply the green base color, then use a thick black marker or thin brush to draw the iconic squared off hairline, heavy brows, and straight mouth across each nail.
This design brings retro horror charm to your manicure by channeling vintage movie monster aesthetics. The color combination feels instantly recognizable while remaining simple enough for home application, even if you lack advanced nail art experience.
- Nail shape: Square or oval
- Base color: Minty green or olive green
- Accent details: Bold black lines creating facial features and the distinctive flat top hair
- Finish: Matte or glossy topcoat
- Optional add ons: Tiny metal bolts on the sides of the “neck” or additional texture
Frankenstein nails appeal to people who enjoy retro horror references and want their manicure to spark conversation. The minimalist line work suits all nail shapes and lengths, though square nails provide more surface area for detailed features. These nails maintain their appearance well throughout two to three weeks of wear, though black lines may fade slightly with heavy use.
8. Witchy Purple and Black Marble
Witchy marble nails combine deep purple and black swirled together in an organic, flowing pattern that evokes magical potions and mystical energy. Swirl the two colors together on the nail using a thin brush or a marble technique, creating an asymmetrical pattern that feels intentional and artistic.
The design embodies Halloween witchiness without requiring specific imagery, instead relying on color psychology and marble texture for impact. The organic nature of marble means imperfections enhance rather than detract from the overall aesthetic.
- Nail shape: Almond, oval, or coffin
- Base color: Deep purple with black marble swirls throughout
- Accent details: Optional gold or silver flecks for magical shimmer
- Finish: Glossy topcoat or matte for a more mysterious appearance
- Optional add ons: Tiny gold moons or stars scattered across the design
This design transitions seamlessly from Halloween into November because the color palette feels autumnal and mystical rather than explicitly spooky. The marble technique works beautifully on all nail lengths and suits both minimalist and maximalist preferences depending on fleck additions. Maintain these nails with regular topcoat application to preserve the marble pattern and prevent color fading.
9. Skeleton Bone Hand Nails
Skeleton bone nails feature white or cream base color with black finger bone details creating the appearance of skeletal hands across each nail. Paint thin black lines representing bones along the length of each nail, with small circles at the joints to create anatomically inspired finger bone illustrations.
The design appeals to people wanting something educational and artistic because it references actual anatomy while feeling seasonal and spooky. The line work remains simple enough for home artists to accomplish with patience and a steady hand.
- Nail shape: Oval or almond (shapes that elongate the bone appearance)
- Base color: White, cream, or pale yellow
- Accent details: Black bone line work with circular joints
- Finish: Glossy topcoat
- Optional add ons: Gray shading or brown wash effects for dimension
Skeleton bone nails work beautifully for anyone seeking an educational angle on their Halloween manicure. The linear design remains visible and striking from any distance, and the neutral base color keeps the nails from feeling overly spooky for workplace or formal settings. Plan for these nails to maintain their appearance for two to three weeks with standard topcoat maintenance.
10. Candy Corn Classic Nails
Candy corn nails celebrate the iconic Halloween treat through horizontal stripes of yellow, orange, and white stacked across each nail in the exact color order of actual candy corn. Paint each stripe roughly one third of the nail height, blending the colors slightly where they meet for a smooth, cohesive appearance.
This design brings nostalgic joy to your manicure because candy corn feels quintessentially Halloween despite debates about its actual taste. The bright colors pop against skin and photograph beautifully, and the design feels instantly recognizable to anyone who grew up with Halloween candy.
- Nail shape: Square or oval (provides clear horizontal sections)
- Base color: Yellow base with orange and white stripes layered on top
- Accent details: Clean color separation between each stripe
- Finish: Glossy topcoat for sweet shimmer
- Optional add ons: Tiny black dots or swirls for added personality
Candy corn nails appeal to anyone seeking a cheerful, non spooky Halloween aesthetic that still feels completely on theme. The bold color combination suits all skin tones and works beautifully on both short and long nails. These nails require minimal detail work and maintain their appearance exceptionally well throughout two to three weeks of regular wear.
11. Glowing Pumpkin Patch Nails
Pumpkin patch nails feature orange pumpkins with green stem details against a deep green or dark base color representing a nighttime patch. Paint tiny orange circles of varying sizes across each nail, then add small green curved lines at the top of each pumpkin to create stems and vines connecting them.
The design captures the harvest season feeling of Halloween through botanical elements and warm colors. The small pumpkin circles work wonderfully as detail work that feels achievable because simplicity enhances charm rather than requiring photorealism.
- Nail shape: Almond or oval
- Base color: Deep green, dark forest green, or black
- Accent details: Orange pumpkins with green stems and connecting vines
- Finish: Glossy or matte topcoat
- Optional add ons: Tiny gold or bronze accents or glow in the dark polish effects
Pumpkin patch nails transition beautifully from Halloween through Thanksgiving and work for anyone seeking seasonal nails that feel festive without relying on horror imagery. The organic shape of pumpkins means perfect symmetry is unnecessary, making this design forgiving for home application. These nails maintain excellent longevity throughout two to three weeks of standard wear.
12. Moon and Stars Mystical Nails
Moon and stars nails transform your fingertips into a night sky scene through deep blue or black base color with white or silver moon and star details scattered across in an asymmetrical, dreamy arrangement. Use a thin brush or dotting tool to create crescents and dots of varying sizes, avoiding perfect alignment to maintain organic, mystical energy.
The design appeals to people drawn to cosmic and magical aesthetics because it suggests enchantment and mystery without explicit spooky imagery. The nighttime sky concept feels inherently Halloween adjacent while remaining suitable for extended wear beyond October.
- Nail shape: Coffin, almond, or oval
- Base color: Deep navy, dark blue, or black
- Accent details: White or silver moons and stars of varying sizes
- Finish: Glossy topcoat or matte for a more mysterious appearance
- Optional add ons: Fine glitter, shimmer dust, or pearl effects
These nails work beautifully for anyone preferring subtler Halloween aesthetics or mystical over explicitly spooky themes. The scattered nature of stars and moons means small variations feel intentional and artistic. Maintain the topcoat every five to seven days to preserve the design clarity and prevent the base color from appearing dull or worn.
13. Striped Witch Hat Accent Nails
Striped witch hat nails feature one or two accent nails with a bold black witch hat design against a contrasting color base, while remaining nails complement with a solid or striped pattern. Paint a wide triangular shape representing the hat crown, then add a thin horizontal rectangle at the base for the hat brim, using negative space or contrasting colors for definition.
The design balances recognizable Halloween imagery with clean, modern execution that feels polished rather than cartoonish. The simplified hat shape requires only basic brush work, making this accessible for home nail artists of varying skill levels.
- Nail shape: Square, almond, or oval
- Base color: White, pale pink, or gold; accent nails can feature black backgrounds for the hat
- Accent details: Bold black witch hat shapes on the accent nails
- Finish: Glossy topcoat
- Optional add ons: Gold buckle details or star embellishments on the hat
Witch hat nails appeal to people seeking a balanced approach to Halloween nails that includes statement details without overwhelming every nail. The focused design draws attention without requiring extensive nail space, making it suitable for shorter nails. These nails maintain excellent appearance throughout two to three weeks of regular wear and handling.
14. Black and White Striped Boo Nails
Striped boo nails combine alternating black and white vertical or horizontal stripes with tiny white ghost characters peeking out or floating across the design. Paint stripes evenly across each nail using tape or a steady hand, then add small white ghost shapes (simple circles with curved boo mouths) to float above or nestle between the stripes.
The design creates visual interest through the stripe pattern while maintaining a playful ghost theme that feels fun rather than frightening. The combination of geometric stripes and cute ghosts appeals to people seeking balanced Halloween aesthetics.
- Nail shape: Square or oval
- Base color: Alternating black and white vertical or horizontal stripes
- Accent details: Tiny white ghosts with simple facial features
- Finish: Glossy topcoat
- Optional add ons: Tiny stars, clouds, or shading details within the ghost shapes
These nails work beautifully for anyone seeking a design that feels Halloween appropriate without relying on gore or frightening imagery. The stripe pattern adds geometric interest while the ghosts provide the seasonal element. The combination maintains visual appeal throughout two to three weeks of wear, and the bold contrast ensures visibility from any distance.
15. Holographic Haunted Mirror Nails
Holographic haunted mirror nails feature iridescent holographic polish creating rainbow mirror effects across your nails, optionally accented with spooky details like black ghosts or bats embedded in or painted over the shimmering base. Apply a quality holographic top coat that shifts between colors as light hits the nails, creating an otherworldly, magical appearance perfect for Halloween.
The design appeals to people wanting something visually stunning and conversation starting because holographic finishes demand attention and sparkle beautifully in any lighting. The combination of technical shimmer with subtle spooky elements creates a modern, sophisticated Halloween aesthetic.
- Nail shape: Coffin, almond, or long oval (showcases holographic shift beautifully)
- Base color: Clear or nude base with premium holographic top coat creating rainbow mirror effects
- Accent details: Optional black ghost or bat silhouettes painted on top of the holographic base
- Finish: Holographic top coat with additional glossy topcoat for protection and shine
- Optional add ons: Tiny rhinestones, glitter embedded in the holographic layer, or additional shimmer effects
Holographic haunted mirror nails represent the intersection of technical nail artistry and seasonal creativity, making them perfect for anyone seeking something truly special. The shift in color as you move your hands creates dynamic visual interest and photographs exceptionally well from multiple angles. These nails require high quality products and careful application but reward effort with stunning, long lasting results that maintain vibrancy throughout two to three weeks of wear.
Frequently Asked Questions
How long do Halloween nail designs typically last?
Most Halloween nail designs last between two to three weeks depending on your daily activities, nail growth rate, and how well you maintain them with topcoat reapplication. Designs with delicate details like thin lines or small embellishments may show wear slightly earlier than solid color designs, but quality topcoat application every five to seven days extends longevity significantly.
Factors affecting longevity include your profession, hobbies, and how frequently your hands contact water or harsh chemicals. People with active lifestyles or jobs requiring frequent hand washing may experience slightly shorter wear time, while those able to be gentler with their nails enjoy the full three week lifespan.
Can I create these designs at home, or should I visit a salon?
Most of these designs are entirely achievable at home with basic tools including a thin nail brush, dotting tool, and quality polish, though some designs like marble techniques or detailed line work benefit from salon expertise. Many people successfully create designs like cat silhouettes, blood drips, candy corn, and striped patterns at home with patience and proper technique.
If you prefer guaranteed results or enjoy the pampering experience, salon application ensures professional quality and allows you to discuss customizations with your nail artist. Starting with designs featuring simple shapes or solid colors helps build confidence before attempting intricate detail work at home.
What shapes work best for Halloween nail designs?
Almond, oval, and square shapes provide excellent surface area for designs and work beautifully across all suggested nail ideas in this article. Coffin and stiletto shapes offer elongated canvases that emphasize certain designs like vampire fangs or holographic effects, though these shapes require more careful handling to prevent breakage.
Shorter, rounder nail shapes remain equally viable for Halloween designs and often feel more practical for daily activities. Choose shapes that match both your lifestyle and personal aesthetic preferences rather than selecting based solely on design requirements.
How should I remove Halloween nail designs without damaging my nails?
The safest removal method involves soaking your nails in acetone or rubbing alcohol for ten to fifteen minutes, allowing the polish to soften before gently scraping it away using a wood or plastic tool. Soak each hand in a small bowl rather than applying acetone on cotton pads to your nails, as this method prevents drying and skin irritation.
Avoid peeling or picking at the polish, which removes the top layer of nail along with the design and causes damage and weakness. After removal, apply cuticle oil or hand cream to restore moisture and keep your natural nails healthy before applying a new design or polish.
How do I care for my nails between manicures to maintain design integrity?
Wearing gloves during dishwashing and household chores protects your nails from water damage and extends design longevity significantly. Reapplying topcoat every five to seven days maintains shine and creates an additional protective barrier against chipping and wear.
Avoid using your nails as tools for opening containers or scratching surfaces, which causes breakage and damage regardless of design. Keep your nails properly hydrated by using cuticle oil daily and avoiding prolonged exposure to harsh chemicals or excessive water.
Are there specific base colors that make Halloween designs last longer?
All properly applied base colors offer similar longevity when sealed with quality topcoat, though lighter base colors may show yellowing over time if exposed to sunlight or products with staining potential. Choosing creme finishes over sheer colors provides more complete coverage and typically shows wear slightly less obviously than translucent options.
The topcoat matters significantly more than base color choice for longevity, making quality topcoat application and regular refreshing more important than base color selection. Focus on selecting colors that complement your skin tone and personal style rather than choosing based solely on perceived longevity.
Can I layer multiple design elements or should designs stay simple?
Layering multiple design elements works beautifully when each component remains clear and distinct, preventing a cluttered or muddy appearance. Combining elements like base stripes with accent ghost details or marble bases with glitter overlays creates visual interest without overwhelming your nails.
However, ensuring each layer has adequate drying time prevents smudging and color bleeding. More detailed designs require patience and precision but reward careful application with stunning, dimensional results that spark conversation and admiration.
Final Thoughts
Halloween nail designs offer the perfect opportunity to experiment with colors, patterns, and creative expression without the commitment of permanent body art. Whether you choose subtle celestial themes, bold spooky imagery, or playful candy corn classics, these fifteen ideas provide genuine options for every skill level, aesthetic preference, and comfort zone with seasonal celebration.
Your nails deserve to feel special and intentional this Halloween season, whether you spend five minutes painting simple stripes or an hour creating intricate details. Take time to select designs that genuinely excite you, practice techniques without pressure or perfectionism, and remember that imperfections often enhance the handmade, artistic quality of nail art. Enjoy the process, experiment fearlessly, and celebrate the creativity that nail design brings to your daily life.
If you loved these ideas and want to explore more Halloween nail inspiration, check out our complete guide to Halloween nail ideas for additional designs and techniques. You can also discover even more options in our collection of simple Halloween nail ideas if you prefer designs that require minimal tools or experience.