Valentine’s Day calls for nails that capture romance, playfulness, and just the right amount of sparkle. Whether you prefer soft pastels, bold reds, or intricate nail art, this collection of cute Valentine nail ideas offers something for every aesthetic and skill level. Scroll through to find your next favorite design.
These designs range from minimalist and elegant to fun and whimsical, ensuring you’ll discover inspiration that matches your personal style. Each idea includes detailed descriptions and practical tips to help you recreate the look at home or bring it to your nail technician.
Cute Valentine Nail Ideas
1. Red Heart Accent Nails
This timeless design pairs a creamy nude or soft pink base with bold red heart shapes on your accent fingers. The hearts sit perfectly centered on the nail, creating a balanced and instantly recognizable Valentine statement. You’ll achieve maximum impact with minimal complexity, making this ideal for beginners and experienced nail artists alike.
The beauty of this design lies in its versatility and charm. You can paint hearts freehand using a thin brush, or use nail stickers and decals for precision if you prefer a cleaner finish. Either approach delivers a polished, intentional look that feels both classic and current.
- Nail shape: almond or oval
- Base color: nude, blush pink, or cream
- Accent details: bright red hand painted or sticker hearts
- Finish: glossy top coat
- Optional add ons: rhinestones around heart borders or metallic gold outlining
This design works beautifully for office settings, casual outings, or romantic dinners. Red hearts photograph wonderfully and pair well with any outfit, making them a reliable choice throughout the entire Valentine season.
2. Pink Ombré Gradient Nails
A soft ombré effect transitions from pale blush on the cuticle to deep mauve at the tip, creating depth and dimension with zero pattern required. This gradient style suits longer nails best, as the color transition needs space to truly showcase its beauty. The seamless blending of pink tones evokes romance without feeling over the top.
You’ll achieve this look using a makeup sponge dabbing technique or an airbrush if you have access to one. The key is blending multiple shades of pink and mauve together until no harsh lines remain between colors. This technique rewards patience with a sophisticated, salon quality result.
- Nail shape: coffin, ballerina, or almond
- Base color: pale pink foundation
- Accent details: gradient blend of medium pink, rose, and mauve
- Finish: glossy or matte top coat
- Optional add ons: holographic glitter on tips or tiny pearls embedded in the gradient
Ombré nails maintain their appeal across all seasons and occasions, but they feel particularly romantic during February. The subtle color transitions work with formal attire, everyday wear, and everything in between.
3. Cupid’s Arrow Nails
A playful twist on Valentine symbolism, these nails feature white or nude bases with gold arrow designs pointing diagonally across the nail. The arrows suggest movement and energy, bringing a fun, whimsical quality to your fingertips. Gold or rose gold metallic polish creates the perfect shimmer for this charming motif.
You can paint arrows freehand with a thin detailing brush, or use striping tape to create perfectly straight lines. Adding a tiny heart at the arrow’s point amplifies the Valentine theme while maintaining visual balance. This design appeals to those who want something cute without being overly romantic.
- Nail shape: stiletto, coffin, or oval
- Base color: white, cream, or nude
- Accent details: gold or rose gold metallic arrows with optional heart tips
- Finish: glossy top coat
- Optional add ons: rhinestones along arrow shafts or contrasting nail art on one accent nail
This design performs well for casual Valentine celebrations, galentine’s day gatherings with friends, or any occasion where you want subtle romance with personality. The playful arrow imagery makes this choice feel fresh and contemporary.
4. Marble Love Nails
Swirled marble patterns in shades of pink, white, and rose gold create organic, one of a kind designs on each nail. The watercolor effect mimics natural stone while incorporating romantic hues that feel elevated and artistic. This technique works beautifully on any nail shape and length.
You’ll create marble effects by dropping different colored polishes into water and swirling them together, then dipping your nail into the pattern. Alternatively, you can recreate the look directly on the nail by swirling wet polish with a thin brush or toothpick. Both methods require practice, but the results justify the effort invested.
- Nail shape: any shape works equally well
- Base color: white or cream foundation
- Accent details: swirled pink, mauve, and rose gold veining
- Finish: glossy top coat
- Optional add ons: gold leaf accents or holographic particles scattered throughout
Marble nails photograph exceptionally well and convey an artistic, intentional aesthetic. They suit someone confident in their personal style and willing to showcase designs that feel gallery worthy.
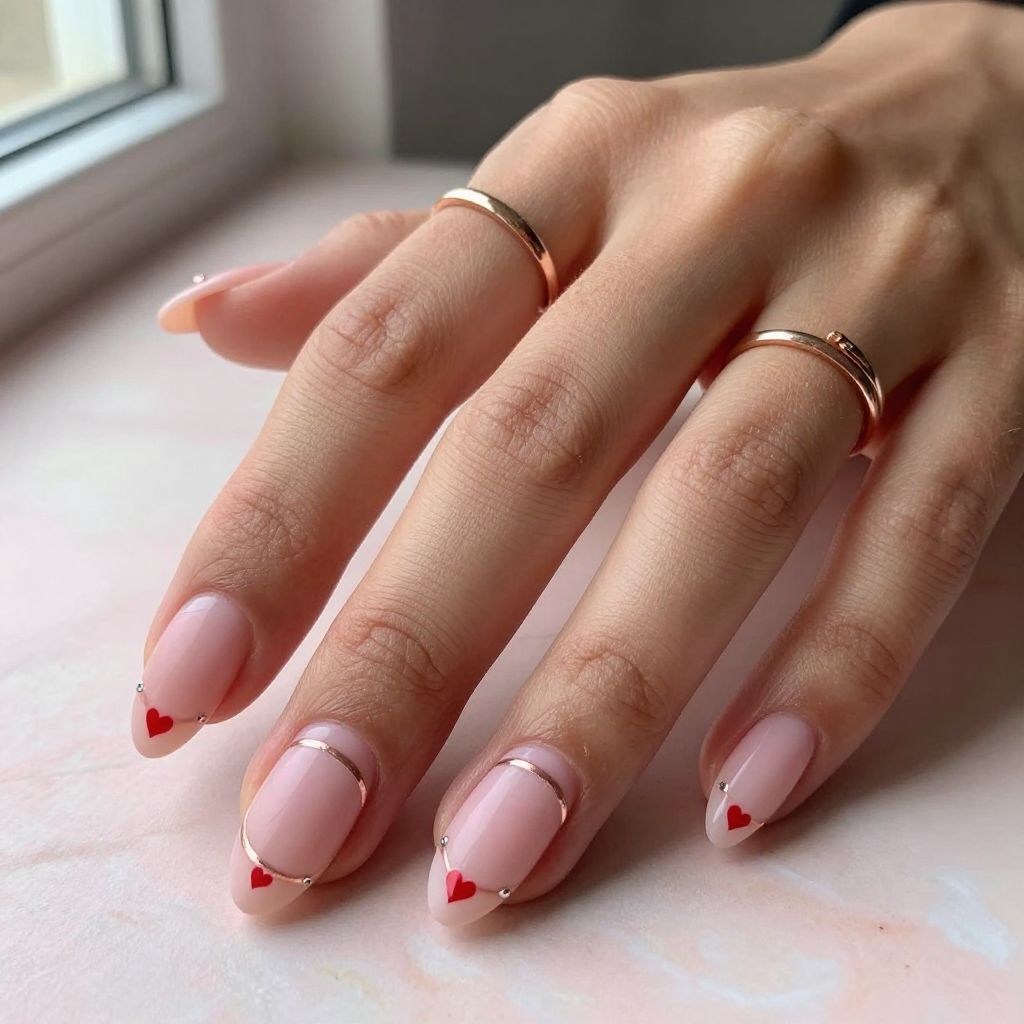
5. Double Liner Love Nails
Two thin metallic lines frame the nail horizontally, with a delicate red heart painted between the lines on select accent nails. This geometric approach combines precision with romance, creating visual interest without overwhelming complexity. Rose gold or chrome metallic liners provide the perfect contrast against pale pink or nude bases.
You’ll execute this design by painting your base color first, then using a thin striping brush or metallic pen to draw perfectly straight lines. Once those lines dry completely, add your tiny heart or additional motif in the space between. The minimalist composition feels contemporary and intentional.
- Nail shape: round, oval, or almond
- Base color: pale pink, blush, or nude
- Accent details: rose gold or chrome horizontal lines with red or pink hearts
- Finish: matte or glossy top coat
- Optional add ons: tiny diamond shaped studs on the heart or additional geometric shapes
This design feels sophisticated enough for professional settings while remaining playfully romantic. It suits those who appreciate minimalist aesthetics merged with holiday themed elements.
6. Red Velvet Nails
A plush red velvet finish creates texture and depth that catches light beautifully from every angle. Velvet polish or specially applied velvet powder over red base polish transforms your nails into tactile, luxurious surfaces. This finish feels premium and fashion forward, perfect for someone seeking something beyond standard finishes.
You’ll apply velvet powder while the base polish remains sticky, then seal with a clear top coat to preserve the texture and prevent shedding. The application requires precision, but results in nails that feel as luxurious as they look. Velvet finishes work best on nails kept at medium length or longer.
- Nail shape: square, coffin, or almond
- Base color: deep red polish
- Accent details: velvet powder application for tactile texture
- Finish: clear protective top coat
- Optional add ons: gold foil accents or rhinestones on one accent nail
Red velvet nails make a sophisticated statement for formal Valentine events, dinner dates, or anyone wanting nails that feel genuinely special. The texture invites touch and conversation, making this choice memorable.
7. Negative Space Heart Nails
By leaving portions of the nail bare and using negative space strategically, you create heart shapes in the nude natural nail surrounded by color. This clever optical technique requires planning but delivers impressive visual impact. Soft pink or red polish framing a nude heart center creates elegant contrast.
You’ll accomplish this by applying base color while using nail tape or stickers to mask off the heart shaped space in the center. Once your polish dries, remove the tape carefully to reveal the natural nail underneath. This technique demonstrates intentional design thinking and artistic sensibility.
- Nail shape: almond or oval
- Base color: natural nude nail
- Accent details: heart shaped negative space surrounded by soft pink or red
- Finish: glossy top coat
- Optional add ons: metallic outline around the heart shape or tiny dots inside the heart
Negative space nails work across all seasons and occasions, but feel particularly Valentine appropriate with heart motifs. This design appeals to those appreciating modern, minimalist aesthetics with symbolic meaning.
8. Glitter Gradient Love Nails
Fine glitter gradually increases in density from the base to the tips, creating a sparkly ombré effect that builds in intensity. Rose gold, pink, or red glitter mixed into clear or tinted base polish produces glamorous, eye catching results. This design captures Valentine magic while maintaining wearable elegance.
You’ll apply light glitter placement near the cuticle, then densely pack glitter toward the tip using a sponge or glitter brush. Seal everything with a quality top coat to ensure glitter stays put throughout wear. The gradient effect creates visual flow that’s both romantic and sophisticated.
- Nail shape: coffin, ballerina, or almond
- Base color: clear, pale pink, or champagne
- Accent details: rose gold or red glitter in increasing density toward tips
- Finish: thick glossy top coat
- Optional add ons: holographic accents or chrome metallic tips
Glitter gradient nails suit anyone seeking glamour without maximum drama. They work for date nights, celebrations, and occasions when you want nails that genuinely sparkle.
9. Pink and White Striped Nails
Alternating vertical stripes of soft pink and white create cheerful, clean lined designs that feel both playful and sophisticated. This classic candy striped approach evokes vintage charm while remaining thoroughly contemporary. The simplicity belies the polished, intentional appearance.
You’ll create this pattern using striping tape to mask off alternating vertical lines, then paint each section in alternating colors. Ensure paint fully covers under the tape before removal to achieve crisp, clean edges. The result feels salon finished and precisely executed.
- Nail shape: square, oval, or almond
- Base color: soft pink foundation
- Accent details: white vertical stripes evenly spaced across the nail
- Finish: glossy top coat
- Optional add ons: tiny red hearts at stripe intersections or metallic edges
Striped nails feel fresh and approachable for office environments or casual outings. The design doesn’t scream Valentine aggressively, making it suitable for extended wear beyond February.
10. Pressed Flower Nails
Real dried flowers or realistic floral decals embedded under clear polish create botanical garden aesthetics on your fingertips. Tiny pressed roses, forget me nots, or baby’s breath flowers paired with nude or pale pink bases feel romantic and naturally beautiful. This approach combines artistry with genuine botanical elements.
You’ll apply your base color, position dried flowers or floral stickers on the wet polish, then seal everything with multiple layers of clear top coat. Real flowers require careful handling to prevent shattering, while decals offer easier application with similar visual impact. Either method creates conversation starting nails.
- Nail shape: almond, oval, or coffin
- Base color: nude, pale pink, or cream
- Accent details: pressed flowers or high quality floral decals
- Finish: thick clear protective top coat
- Optional add ons: gold leaf accents around flowers or rhinestone embellishments
Pressed flower nails appeal to those seeking elegant, nature inspired Valentine aesthetics. The designs feel organic and sophisticated, perfect for someone with artistic sensibilities.
11. Sweetheart Candy Nails
Conversation heart designs featuring tiny text messages and pastel colors recreate the charm of classic Valentine candy directly on your nails. Pale yellow, pink, lavender, and mint green bases with hand painted or printed text create playful nostalgia. This design brings childhood joy into adult nail art.
You’ll paint your base colors first, then use a toothpick or extremely fine liner brush to paint tiny phrases like “Be Mine” or “True Love” on each nail. Alternatively, you can use nail stamping plates designed specifically for text and candy hearts. The tiny details create charm when viewed up close.
- Nail shape: round or oval
- Base color: pastel pink, yellow, lavender, or mint green
- Accent details: hand painted or stamped text messages in contrasting colors
- Finish: glossy top coat
- Optional add ons: edible glitter or rhinestones scattered across nails
Sweetheart candy nails work best for casual Valentine celebrations or galentine’s gatherings with friends. The playful, cheerful aesthetic appeals to those who don’t take themselves too seriously.
12. Metallic French Tips with Heart Details
A classic French manicure receives Valentine treatment with rose gold or champagne metallic tips and tiny heart embellishments near the tip line. This approach merges timeless elegance with seasonal charm, creating nails suitable for multiple occasions. The soft, warm metallics complement all skin tones beautifully.
You’ll apply your pale pink or nude base, then paint metallic tips using a thin brush or stencil for clean lines. Once dry, add tiny hearts along the tip line using a toothpick dipped in contrasting polish. The combination feels refined and intentionally designed.
- Nail shape: almond, oval, or coffin
- Base color: pale pink or nude
- Accent details: rose gold or champagne metallic tips with tiny red or pink hearts
- Finish: glossy top coat
- Optional add ons: rhinestones on tips or glitter gradient toward the free edge
Metallic French tips work across professional and casual settings, making them incredibly versatile. The design feels elevated and special without demanding excessive maintenance or upkeep.
13. Blush and Rose Gold Glitter Nails
A soft blush pink base showcases scattered rose gold glitter that catches light beautifully, creating romantic shimmer without overwhelming sparkle. This subtle approach appeals to those preferring understated elegance over maximum drama. The combination feels naturally luxurious and perpetually wearable.
You’ll apply your blush base, then sprinkle rose gold glitter while polish remains tacky, allowing pieces to set into the surface naturally. Use a top coat to seal everything and prevent glitter migration. The random placement creates organic, natural looking shimmer.
- Nail shape: almond, oval, or square
- Base color: soft blush pink
- Accent details: scattered rose gold glitter particles
- Finish: glossy top coat
- Optional add ons: tiny rhinestones or holographic microglitter mixed with rose gold
Blush and rose gold nails suit professional environments, date nights, and anyone seeking romantic polish without Valentine screaming details. The design feels timeless and refined.
14. Reverse Ombré Love Nails
Opposite of traditional ombré, this design features deep burgundy near the cuticle transitioning to pale pink at the tips. The inversion creates visual interest and unexpected movement across the nail. This approach feels artistic and demonstrates sophisticated color theory application.
You’ll apply your deep burgundy base, then blend progressively lighter shades using a makeup sponge until reaching pale pink at the free edge. The blending process requires patience and multiple polish layers, but results in depth that standard application cannot achieve. The effect feels professionally executed.
- Nail shape: coffin, ballerina, or almond
- Base color: deep burgundy foundation
- Accent details: gradient blend through rose, mauve, and pale pink
- Finish: glossy or soft matte top coat
- Optional add ons: holographic glitter on tips or metallic stripe details
Reverse ombré nails demonstrate technical skill and artistic sensibility. This design appeals to those comfortable taking design risks and seeking something genuinely distinctive.
15. Romantic Lace Nails
Delicate lace patterns created through stamping or hand painting overlay soft pink or white bases, producing intricate designs reminiscent of fine lingerie. The detailed patterns require steady hands or quality stamping plates, but deliver genuinely stunning results. This design feels utterly romantic and refined.
You’ll apply your base color first, then use lace themed nail stamps or paint lace patterns freehand using white or rose gold polish. Multiple thin layers create dimension without overwhelming the delicate aesthetic. The result feels wedding worthy and genuinely special.
- Nail shape: almond, oval, or coffin
- Base color: soft pink or white
- Accent details: intricate white or rose gold lace patterns
- Finish: glossy top coat
- Optional add ons: rhinestones at lace intersections or pearl accents
Romantic lace nails suit formal Valentine events, engagements, or anyone seeking genuinely elegant nail art. The intricate patterns demand close viewing and appreciate the artistry invested.
Frequently Asked Questions
How long do Valentine nail designs typically last?
Most gel or polish based nail designs last between two and three weeks with proper care and daily precautions. Gel manicures generally outlast traditional polish by five to seven days, particularly if you avoid excessive water exposure and maintain cuticle health. Regular touch ups and top coat reapplication extend wear time significantly.
Can I create these designs at home without professional experience?
Many of these designs suit home application, particularly simple hearts, stripes, and basic ombré effects. However, techniques like stamping, complex lace patterns, and velvet finishes benefit from professional experience or extensive practice beforehand. Start with beginner friendly designs, invest in quality tools, and be patient as you develop technique. YouTube tutorials and online guides provide invaluable step by step instruction.
Which nail shapes work best for Valentine designs?
Almond, oval, and coffin shapes suit most Valentine designs beautifully, as they provide balanced canvas space without excessive sharpness. Shorter rounds and squares work equally well for minimalist designs like hearts and stripes. Choose shapes based on your personal preference, lifestyle, and comfort level with longer nails. Length matters less than selecting a shape you can maintain comfortably.
How should I maintain Valentine nail designs throughout their wear?
Wear gloves when cleaning or doing dishes to prevent polish chipping and water damage. Apply fresh top coat every three to four days to maintain shine and protect designs. Avoid exposing nails to harsh chemicals or excessive temperatures. Moisturize cuticles regularly and consider nail strengthening treatments between manicures to maintain nail health. These practices extend design longevity and keep nails looking fresh.
What is the best way to remove Valentine nail polish without damaging nails?
Soak cotton pads in acetone based remover, wrap them around each nail with foil, and leave for ten to fifteen minutes to dissolve polish gently. Push off softened polish with a cuticle stick rather than scrubbing aggressively. Acetone free removers work more gently but require longer soaking times. Follow removal with moisturizing treatments and cuticle oil to restore hydration. Never peel or pick at polish, as this damages the nail surface irreversibly.
Can I combine multiple nail art techniques on the same manicure?
Yes, combining techniques like ombré bases with glitter accents or stamped designs with rhinestones creates truly personalized results. Limit combinations to two or three techniques maximum to maintain visual balance and avoid overcrowding designs. Ensure techniques coordinate cohesively rather than competing for attention. The most successful multi technique designs feel intentional and harmonious.
How do I choose between gel and traditional polish for Valentine designs?
Gel manicures last longer and dry instantly, making them ideal for intricate designs requiring careful curing between layers. Traditional polish allows easier corrections if mistakes occur and requires no special equipment for removal. Gel suits busy lifestyles and those preferring extended wear, while traditional polish works better for budget conscious application or frequent design changes. Consider your lifestyle, budget, and nail health when deciding.
Final Thoughts
Valentine’s Day nail inspiration exists across every aesthetic, skill level, and preference, from timeless red hearts to artistic lace patterns and everything beautifully in between. Whether you choose bold velvet finishes, delicate florals, or playful candy designs, your nails deserve to reflect your personal style and celebrate the season meaningfully. The designs featured here provide starting points for customization and creative expression.
Don’t hesitate to mix colors, combine techniques, or adapt designs to suit your unique taste. Nail art celebrates self expression and creativity, so embrace experimentation and enjoy the process. Your Valentine nails should make you feel confident, beautiful, and genuinely excited about sharing them with the world.
Explore our collection of Valentine nail ideas for even more inspiration, and visit our guide to cute Valentines nail ideas for additional design options and trending styles. Whether you’re preparing for a romantic dinner, celebrating with friends, or simply treating yourself to beautiful nails, these resources provide endless creative possibilities. Your next favorite nail design awaits.